Thursday, January 26, 2012

Scratch & Peck | Homegrown Living | Shelby, Texas

Well, I guess I lied.  Back on January 9th, I proclaimed that my New Year's resolution was to blog at least twice a week....dang, January isn't even over yet and I already bombed out on that resolution.  Maybe it's better if I don't make a resolution :)

Last week, the lovely and talented Senior Editor at Texas LIVE Magazine, Natalie Lacy Lange posted about her backyard beauties on her fun and informative blog - The Shady Acre.  So I was inspired to blog about some excitement we had with our chickens a couple of weeks ago.

We became the proud parents of new furry feathered chicks!  Our chickens have hatched their eggs before, but these have been really fun - because they are descendants of our flock of "big" chickens.  When we first started out on the journey as chicken owners, we had 3 bantam partridge variety hens and 2 bantam roosters.


Bantam means that it is a small variety and the chickens won't weigh more than about 2lbs.  They also lay small brown eggs.


We (Brad) were kind of freaked out by the smallish eggs, so we decided after we'd gotten the hang of chicken farming, we'd add some large varieties to our family.  Our local general store has a great selection of baby chicks in the spring time.  So we went in, picked four varieties that produce large eggs and got two of each and crossed our fingers that we didn't have any roosters in the mix.  The chicks are "supposed" to all be hens, but it's not always the case.


We ended up getting Red Leghorns, White Leghorns, Light Brahmas and Silver Gray Dorkings.  Thankfully, only one out of that whole group ended up being a rooster...meet Big Mix!  His deep crow can be heard from a mile away!


His counterpart Chloe died over the summer - we're still not sure what happened, but we're thinking she was egg-bound.


Meet Felipe (aka Dorothy Zbornak from the Golden Girls) - she's a hen - but for the longest time thought she was a rooster - hence the name Felipe lol.


Her counterpart who didn't really have a name for yet was killed by some varmit this summer too.

Meet Henny & Penny our Red Leghorns  & Flip & Flop our White Leghorns


This group of "big" chickens lay eggs that are big and plentiful. Brad said that when winter came we may not get any eggs.  Their production has slowed down, but we still get 3-4 a day from them.

One of our "little" chickens is the Mama of the entire group. It doesn't matter if it's her small eggs or big eggs, you can count on her to sit.  We noticed that she started sitting on a group of eggs and we decided to let her keep at it and see what would happen.  The night before they hatched, Brad put some of the eggs up to his ear and could hear them chirping, so we knew something would happen in the next few hours.  I went out to the coop the next morning and found 5 furry little cuties.  Here they are 2 weeks later!


They've already started getting their wing feathers and Mama is doing her job showing them how to scratch for food and is busy keeping them in line.  Stay tuned to see their growth as I will be documenting their transition into "big" chickens!

post signature

Monday, January 9, 2012

DIY No-Sew Scarf | Shelby, TX

If you were wondering if the Homegrown Living blog was dead - I'm here to say, it's alive and soon to be kickin!  Late last year I was consumed with commercial photography and writing/blogging and severely neglected my own blogs.  So since it's 2012 and it's January - the month of a million New Year's resolutions - I've resolved to blog more ....like at LEAST twice a week!

Raise your hand if you have been bitten by the Pinterest bug?  About a month ago, I wanted to see why everyone was SO "Pinterested" in it...and would you know, joining is by invitation only!!  What a snobbish website, was my first thought ....and then I was getting upset because it took FOREVER to finally get my invitation.  But once I logged on - I've been totally in love!

I've come across a zillion neat ideas, but today for some reason, I was moved to try the DIY No-Sew Scarf.  The tutorial I'm going to give today is just one of the many styles you can make.  Check out this neat blogger and all the ways she makes hers at The DIY Dish.

I was really surprised at how easy and virtually cost-free this project was.  All you need is a t-shirt and some scissors - yes, that's it!  You don't have to run out and buy a new shirt either.  It can be an old shirt, maybe one with a stain on it that you only wear when you're slumming around the house.  Or you could even pick up a shirt at Goodwill or any other thrift store for less than $1.

So here we go:

Pick out a solid color or pattern that you like.  It's best to use a shirt that's XL or 2X, depending on how much length you want.  For children - using a shirt that's the same size as what they generally wear is perfect.


Next cut off the hem at the bottom of the shirt.  You don't have to worry about making a perfectly straight line or if it's jagged - the fabric will curl up later in the process.


Now cut the shirt right at the armpit area.  Once again, do not worry about making perfect cuts.


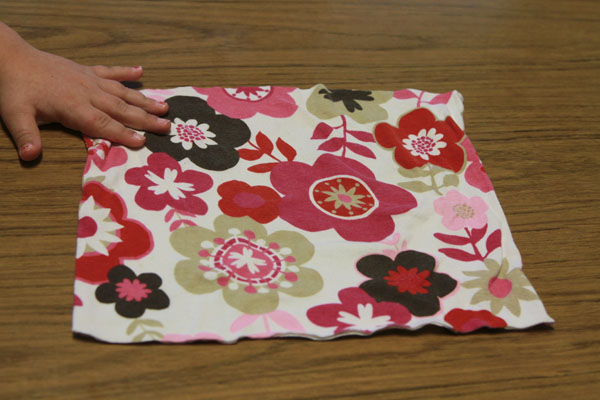
Now you will have a square band of fabric.  Have your trusty assistant stretch the t-shirt material for you like this!


Next you will cut strips on each side of the fabric like this.  The cuts don't have to be uniform - this is really a no-brainer.


After you have cut strips on both sides, take each strip and pull on it so that the fabric pieces will curl up.  


And voila! You have a funky and unique scarf to add to your wardrobe this winter (or any season).  


Had I known how to make these things before Christmas, I would have made one for every person I know.  Oh well, maybe next year!

Here's the one I made this morning.  


Since my shirt was bigger than a 2X it was a little longer, so I used some of the excess t-shirt material that I cut off to tie the scarf in the middle.  All I did was tie it in a bow.   


Now was that easy or what?  T-shirts will no longer be safe in my house!  Happy cutting!

post signature

Sunday, October 30, 2011

Birdhouse Fun | Homegrown Living

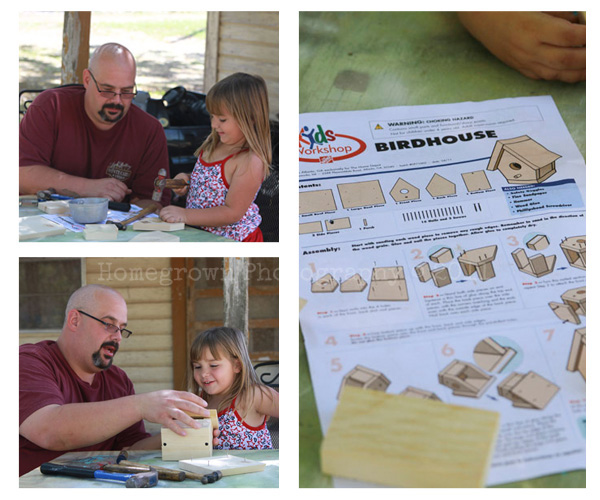
Last weekend we actually had a Sunday that wasn't filled with a million things to do or places to go, so Brad and Addyson decided to enjoy the cooler weather outside and do an Addy & Daddy project.  They put together a birdhouse kit from Home Depot.  If you have a child ranging from 4-7, this would be a great thing to do together.

Brad had to help Addyson figure out the best way to hammer in all the nails...

and then there was learning how to follow instructions! 


 That's a hard one around this place :)


This little doll knows her way around tools apparently!  Look at her screwdriving technique :)


After lots of hard work, laughter and sticking out her tongue, the finished product was ready for some little birds to enjoy.


Well, there aren't actually any birds enjoying it at the moment.  It's now a new decoration in Addyson's room!


post signature

Tuesday, October 4, 2011

Professional Lemonade Maker | Austin County, TX Photographer

Hello friends – it’s been way too long.  Life has been crazy lately, to say the least.  I cannot believe it’s been over 4 months since my last blog post.  That’s just not acceptable.  But I’m back and that’s all that matters right?  So you’re probably wondering, what in the world has been going on in these crazy past 4 months? Well, a lot….  A few days after my last blog post, I took a job cleaning a bed & breakfast – yeah, you read that right – no need to have your eyes checked.  Sometimes in life, we’re presented with lemons and we are just forced to make lemonade – for real!  Since leaving corporate hell, I’ve tried like everything to find a “regular” job out here in the country.  Problem is, you have to know the secret password or at least know someone to even get them to look at your resume - even if you're totally awesome and have mad skills like me! lol  So when the cleaning job came along, I knew I had to take it or we were going to be eating eggs by candlelight, if you know what I mean.   A few weeks after starting that job, I was presented with an opportunity to work in an office – for 4 hours a week….yeah, you read that right too…kind of ridiculous right?  Well, it was a step in the right direction and they promised my hours would increase – so what did I have to lose?  Well, the hours did increase and I was up to working 8 hours a week, when suddenly, all the praying I had been doing finally paid off.

You see back in June, I inquired about a blogging/photography gig for a magazine/website,  you may have heard of it or seen it Texas LIVE Magazine – sounds right up my alley, right?  Well, of course I was completely excited and ready to start yesterday – but just like everything else in my life – I had to wait.  Finally close to the end of August, I got the call.  They wanted to sign me on with a 5 week contract!  I was so excited – my dream was finally coming true – I could take pictures….blog…go to work where I wasn’t required to scrub a toilet – and the best thing, they were going to pay me for it.  Never in my wildest dreams would I have ever thought I would get paid to blog and take pictures. 

Of course with any media job, they had me hit the road running and my first assignment was pretty large and I was feeling pretty overwhelmed - trying to juggle cleaning a B&B, working at the office, completing my blog article assignments – and still be a mom and wife.  These past 5 weeks have been really tough, but I have had some amazing encounters and opportunities.  I was talking to Brad about this last week of my contract and we decided it was pretty hilarious.  You see, last Monday, I was among some great bloggers at a Blogger’s Luncheon being held at The Prairie by Rachel Ashwell (you know, the Shabby Chic Queen) as part of the Antiques Week festivities.  I was there with our Senior Editor Natalie covering this event and it was absolutely wonderful.  I got to sit right next to Rachel Ashwell for a few minutes at our table – and she was a lovely woman – but a couple days later – I was cleaning toilets and making beds at the B&B.  My life is very much an oxymoron these days to say the least – but it has been a wild ride!

P.S. - Be on the look out for the next Lil Miss Austin County Fair Winner - Addyson just entered this year, so I'm excited to see how she does!


post signature

Thursday, May 26, 2011

Homemade Salsa | Shelby, TX Food Photographer

Lately our garden has been overflowing with vegetables.  As much as I would love to eat every single tomato that I pick, that's just not possible.  So....I've decided to start making salsa so that we can enjoy the tomatoes throughout the year.  Brad and I LOVE salsa!  In fact, it's one of the ways we judge if a mexican restaurant is going to be good or not.  Salsa is the first indicator.  So when I decided I wanted to make salsa, I wanted it to taste as good or even better than what we like at our favorite mexican restaurants.

I searched all over the web and there are a million recipes, but I wanted to have something that was my own.  I took a little from here and a little from there and came up with a perfect mixture for 2 thumbs up salsa!  When Brad tasted it for the first time, his eyes got really big and I got a thumbs up....the quart that I put up in the fridge last Wednesday is almost gone as I sit here and type this today.  So I was urged to hurry and make some more pronto!  So enough talking, here's how I did it:

First, you want to make sure to use good and ripe tomatoes.  You can get them from the grocery store produce section, but really - those tomatoes HAVE NO TASTE!  So you would be better off going to a farmers market or your neighbors garden and getting some.  When I was growing up on my grandparents tomato farm - the perfect tomatoes for this recipe were called "canners".  They're super red and ripe and very tender.  You'll also start off with some of the usual salsa ingredients here:


Wash your tomatoes thoroughly and plunge them a few at a time into simmering hot water for 1 minute.


 Then after 1 minute submerge in an ice cold water bath.   This will make the tomato skins come off very easily, sometimes it will already start falling off without your help.


Next, you will want to roughly chop the rest of the ingredients.  Here's a little tidbit of info I learned recently from Paula Deen.  When I used to chop bell pepper, I always sliced off the top by the stem and threw it away.  Well, Paula said that you can push the stem out and use the rest of the top!  All you do is use your finger to push the stem through - what a great way to use ALL of your bell pepper!


This salsa has a really mild heat factor - with a nice jalepeno flavor.  This is because I remove all the seeds and membrane from the jalepenos.  However, if you're a lover of fire hot salsa, then please leave all the seeds in there - you're brave :)


Then you will process these ingredients in a food processor or blender.  I don't own a food processor - even though I think it would be really nice to have, I really have no extra room for that - so I just use a blender.  If you decide to use your blender too, make sure to take some of your skinned tomatoes and blend them up first so that there is liquid to help move the other stuff around.  If not your blender will start smoking and you'll end up with a crazy mess - trust me! :) Please remember - only use a FEW of the tomatoes for this - the remaining tomatoes will need to be set aside.


After chopping your tomatoes, place them in a pot and then pour in your blended mixture of veggies.  This mixture will look frothy and pink and you're going to think you really screwed up.


Don't worry - this is EXACTLY what you're looking for - pink/frothy = good!

Stir the veggie puree mix and the chopped tomatoes and add your vinegar and salt.  Since I made those pickles last week and have this huge box of canning/pickling salt, that's the kind I use.


However, if you don't have that, just use regular iodized salt - it'll be fine.

Bring to a boil.  Then, turn your heat to low and put a lid on the pot and simmer for 20 mins.  You'll notice at the end of 20 minutes, all the bubbly frothy stuff will be gone.  Turn off the heat and add the chopped cilantro and stir.


At this point, you will want to taste the salsa to see if it needs more salt for your taste preference.  Now, you can start canning as usual or you can let the mixture cool and keep in the fridge for up to 2 weeks - or you can cool the mixture and place in ziploc bags and store in the freezer.  This is a really easy option.  Make sure to use sandwich sized bags and you'll have a perfect serving amount for a group of 3-4 to snack on or have with dinner.  When you're ready to use it, just throw the frozen bag in the fridge overnight or for a few hours and it's ready to eat.   Muy Delicioso!


Homemade Salsa

2 quarts of ripe tomatoes
1 medium bell pepper
2 jalepenos
1 medium onion
4 garlic cloves
¼ c vinegar
1 Tbsp salt (use more to your salt preference)
¼ c cilantro chopped

Please make sure to use ripe tomatoes – sometimes referred to as “canners” at your local farmers market.  They are very red and tender.  Wash tomatoes so that they are free from any dirt.  Then peel tomatoes by dropping them into simmering water for 1 minute and then immediately immerse into an ice cold water bath.  Skin should fall off easily.

In the meantime, use a food processor or blender to chop the bell pepper, jalapenos, onion and garlic.  If using a blender, make sure to put a few tomatoes in the bottom and puree them so that there will be liquid to move the other ingredients around in the blender. 

Do not put all tomatoes in the food processor or blender – cube the remaining tomatoes and put them in a pot with the ingredients that you chopped in the food processor.  Add vinegar and salt and bring to a boil.  At first the mixture will look frothy and pink – you are on the right track – this is good.

Once the mixture comes to a boil, turn burner to low and simmer with a lid for 20 minutes.   Turn off heat and add chopped cilantro and stir.  Taste to see if any additional salt is needed.  It is now ready to eat, or you can put it in a quart jar and can it based on the Ball Book of Canning or you can cool the mixture down and keep refrigerated for up to 2 weeks.  Another option is to let it cool and freeze it in a Ziploc bag – then when you’re ready to use it, place the bag in the refrigerator to thaw.  Enjoy!

post signature

Tuesday, May 17, 2011

Homegrown Dill Pickles | Shelby, TX

When Brad and I planted our garden this year, I was totally excited about having homegrown tomatoes - there is nothing better.  And if you don't believe me, do a blind taste test with one from your local grocery store and one out of your garden or from a farmer's market - you'll fall over!

Anyway, the second most exciting thing about having our garden was having pickling cucumbers.  These are cucumbers made especially for pickling - and I really love them un-pickled in salads too - they have a different flavor from regular old cucumbers!

We discovered our first cucumbers in the garden last week and I was immediately ready to pickle them.  I just finished my second batch this morning and decided I would share the recipe and process with you - do you understand how lucky you are right now? Well, after you try this and eat one - you will!

First you start with pickling cucumbers from your garden - or if you don't have a garden, you can pick them up at the grocery store or a local farmers market.


And of course since these are DILL pickles, you will need some fresh dill.  Now, you can use the fresh dill that's found in the produce section next to all the other herbs, but to really make these good, you'll want to find some of the dill that has started to seed...it looks like this:


Some other ingredients that are good to help flavor the pickles are garlic, onion and some type of pepper, whether it be jalepenos or these red peppers (they look pretty in the jar):


Once you have all your ingredients, you'll want to decide how you want your pickles - sliced, spears or whole.  This depends on the size of your pickles.  My mother in law always has the perfect sized little whole pickles.  Mine on the other hand where rather rotund this year, so I had to spear them and slice them.  I did get a few of those cute little crooked suckers though.


One very important tip that you will want to follow is to make sure to cut off the ends of the pickle.  If you leave the ends on, it will cause the pickles to turn soft and bitter.  So please - listen up here!


The next important thing is your jar.  I'm using quart mason jars that you can pick up at the local grocery store.  These jars come with new lids and rings.


However,  you can use quart jars that you already have on hand, but you'll want to make sure to buy NEW LIDS.  This is very important because anyone who has canned before knows that lids can only be used once or they WILL NOT seal.

I wash my jars and then put them in hot water on the stove for several minutes so that they get sterilized.  I also throw in the lids to sterilize too.

Once your jars have been sterilized and all your ingredients are chopped up and ready to go, you can start putting everything in the jars.  I start out with a stem of dill, a couple garlic cloves, a few slices of jalapeno or red pepper and maybe a few onion slices


Then I start packing in the pickles.  You'll want to make sure you're packing them in there a snug as you can - there's no sense in wasting a bunch of jars because you were afraid to strong arm your pickles!

Then, as you're building you can add more garlic, dill, onion, etc so that the flavor is defined for the pickles at the top of the jar too.


Once you're all done packing in everything, you'll want to pour boiling hot water over all the ingredients in the pickle jar until it fills to the top.  Let the water sit for 5 minutes.


Once the 5 minutes is up, you will want to drain the hot water from the jar.  If your ingredients are packed nice and snug, nothing should fall out when you pour out the water.  However, if you want to be on the safe side you can hold a wide slotted spatula over the mouth of the jar to hold in everything.  Oh yeah, and make sure to wear an oven mitt when you hold that jar - it will be HOT!

After you've poured out all the water, you will want to then pour in the hot brine mixture (recipe below). Make sure to leave about 1/2 of head room at the top of the jar, but also make sure that the brine mixture has covered everything in the jar.


Then, wipe the mouth of the jar with a towel and place the clean lid on the jar and twist on the ring.  Now, don't twist the ring tight at this time.  Twist the ring just until you have a little tightness - once the lids have popped and you know a seal has been created, then you can tighten down the ring.

Let the jars sit on the counter until the lids have sealed.  You'll know this has happened once you hear a "pop" from the lids.  If you press the lid and it clicks, your jar has not sealed.  Once all jars have sealed and cooled - store jars in the refrigerator.  Then you will need to wait 3-4 weeks before eating so that the brine and all the other flavorful ingredients can work their magic.


Homestyle Dill Pickles

Brine:
2 quarts water
1 quart grain vinegar (should be 9% acidity)
1/2 cup pickling salt

Bring ingredients to a boil.  While liquids come to a boil, prepare jars and stuff with fresh dill, garlic cloves, hot peppers and pickles.  Pour boiling hot tap water over the ingredients in the jar.  Let sit for 5 minutes.  Drain off hot water.  Once brine comes to a boil, pour brine over ingredients in the jar, making sure to cover everything.  Make sure to leave 1/2" head room at the top of jar.  Wipe mouth of jar clean and place a new lid on the jar.  Place ring on loosely until jar has sealed by "popping".  Pickles will be ready in 3-4 weeks.  Please keep pickles refrigerated.

Any unused brine can be kept in the refrigerator until another use.  Please make sure to store in a plastic or glass container. 

So there you go - beautiful homegrown dill pickles - made to your specifications with your own two hands!  Enjoy :)


post signature